 Typica: Software for Coffee Roasting Operations
Typica: Software for Coffee Roasting Operations
Typica: Software for Coffee Roasting Operations
Last month I was out at the Global Specialty Coffee Expo in Seattle, Washington where I served as a judge for the U.S. Roaster Championship competition. One of the cool things about this competition is that it's intended to be accessible to people who just enjoy drinking coffee and are curious about coffee roasting. This becomes obvious in two important ways. First, the sensory evaluation of the coffees is done not on the cupping table, but with cups of coffee that were brewed in a common drip brewer. As roasters, though we might wish otherwise, we often don't have control over how the customer brews the coffee, and this choice presents the coffee in a way that's perhaps most representative of how the typical coffee drinker enjoys the beverage. Second, after the presentation, competitors remain on stage where they serve the coffee to anybody in the audience who is interested in trying the coffee. This allows people who have heard the presentation to try the coffee for themselves, make their own observations, and draw their own conclusions.
While the evaluation that I was performing wasn't cupping, some of the mechanics of cupping were kept simply because they're logistically sensible for an event like this. Any time that you're doing some kind of structured evaluation of coffee, there's going to be some need for supplies. If you're taking the coffee with cupping spoons, that means you need clean cupping spoons and rinse cups. If you need to be able to do a physical evaluation of the roasted coffee, that means you need to have some kind of container with a sample of the whole coffee. Samples need to be coded and labeled so that panelist observations are matched to the correct sample (paper and trays). Forms, writing utensils (and if that means pencils, a pencil sharpener), spit cups, palate cleanser? All needed.
With all of these requirements, it's no surprise that even people who do this sort of thing day in, day out, every day for a living might forget something until they need it and recognize that it's not there. The consequences of that range from mild inconvenience to spoiling the entire evaluation session.
The solution to that is to not rely on your memory. For every type of evaluation you intend to run, take some time to write down everything that you need as a checklist. Then, when setting up the evaluation, you can run down the list and make sure that you have everything that you need before there can be any adverse consequences. Note that this doesn't need to be a consumable list. You could set this up in a note taking app on your phone or use a trello card. That checklist is not likely to be perfect on your first attempt, so run a few sessions and update that list as you find things you forgot. If you're in a permanent lab facility, that checklist can be a poster on the wall once you're confident that it's right. Whatever form that list takes, it should be easily available for everybody who might set up an evaluation. One of the keys to having efficient and consistent evaluations is documenting your procedures and ensuring that these are being followed in the same way by everybody. How things are set up must be included in that documentation.
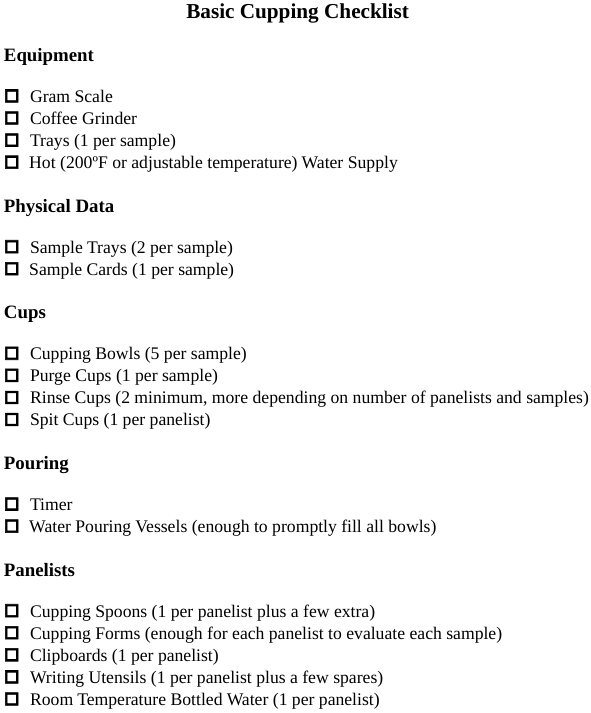
The checklist that you see in this episode covers the basics, but let's run through each of these items and explain why these are important.
First there are some things that aren't on the list as they're not strictly required for cupping, but are useful in sample roasting and in ensuring that a sample roasting program is operating consistently.
While cupping can be used for finished product evaluations, it's less useful than other options until you're able to roast coffee, so a sample roaster is recommended. A timer
and a colorimeter are nice to have to ensure that the sample roasting is being performed consistently. Note that the color of roasted coffee changes over time, so it's important to either be aware of this change and set tolerance on your sample roasting specification appropriately or take this measurement at a consistent amount of time after roasting. Generally when cupping you want to evaluate differences in the coffee, not differences in how the coffee was roasted. The more consistent your sample roasting, the more likely that is to be true.
A set of sieves and a sieve shaker is also useful for measuring the particle size distribution for the coffee grinder that you'll be using at your desired setting. Grinders slip out of calibration and burrs wear down with use, so once you've determined your best grind for cupping, it's a good idea to measure what that is, write it down, and periodically check to make sure that the grind is what you think it is. Grind affects extraction, so changes in grind will affect your results, making it more difficult to compare results from cupping sessions over an extended period of time if the grind is not kept consistent.
While there are standards for sample roasting and grinding for cupping, there's some flexibility in those standards. I recommend going through the relevant specifications and centerlining on every point where there is a decision to be made so you can determine a tighter internal standard that allows you to get the most useful information possible with the specific pieces of equipment that you're using. Once you've made those decisions, remember to write it down. Documentation is key to replication.
There are other useful lab tools that can be used to determine properties of the green coffee prior to roasting. Perhaps I'll get into that in a future episode.
Leaving aside things that aren't on the list, the first category is equipment. You might skip this on your own checklists if you're primarily cupping in a permanent facility, but if you're taking your cupping on the road these are some things that you'll want to know are available.
Cupping bowls are small enough that small variations in the amount of coffee used will be easy to notice, so for better consistency from cup to cup and from sample to sample, you'll want to make sure that you're weighing the coffee in a gram scale. I like to use a scale that measures down to a tenth of a gram.
Once you've weighed out your samples, you need to grind that coffee. That means you need a coffee grinder. In particular, you'll want a burr grinder that can be relied on to produce a consistent particle size distribution without a lot of fuss.
Trays are useful for transporting cups to and from the grinder.
You'll also need some way to get hot water. That might be a big kettle on a fire or a hot water tower. Whatever you use, make sure that you're measuring the temperature and if you need more than one hot water source for your cupping, try to keep the water temperature consistent among those.
Next up are supplies that provide panelists with information about the coffee.
Sample trays can be used to show the green or roasted coffee. When setting up the cupping session, it's important to consider if these would be useful to present. You might decide that you only need one sample tray to show either green or roasted coffee or you might want to avoid having any sample trays if you'd rather the panelists not consider how the coffee looks.
Sample cards provide information on what the sample is. Here again, it's important to consider the purpose of the evaluation. You might just want to write a random number that can later be associated with the sample on a sticky note. Other times you might want to display more information about the coffee.
After this are the various types of cups you might want.
Cupping bowls will hold the coffee and you need however many cups of each sample you intend to evaluate multiplied by the number of samples you're evaluating. Many cupping forms are written on the assumption of five cups per sample.
To avoid cross contamination among the samples and the resulting inconsistency from grinding, you'll want to grind a little bit of each coffee before grinding that coffee into the cupping bowls. For this, you'll want a purge cup. While you could use a cupping bowl for this, I'd recommend using something that looks different so that you don't have to weigh the purge coffee or keep track of which cup you intend to use for that.
When cupping, it's important that you can rinse your spoon between each cup. See episode 1 for more on rinse cups. However many rinse cups you have out at a time, you'll want to switch those out after skimming the cups, so you need at least 2, but as the number of samples you're evaluating increases and as the number of panelists increases, it's easier to work if the number of rinse cups is increased.
If your panelists intend to spit, they should have something to spit in. Unless you're working at a cupping table that has spittoons, count on one spit cup per panelist.
Using differently shaped cups for different purposes helps reinforce the distinctions. Where this distinction is not presented by the cup itself I've seen people try to slurp rinse water or use that as a palate cleanser.
When you pour water on the coffee, you'll want to start a timer. A count down timer can be used to signal when it's time to break the crust or a count up timer can be used to show the amount of time since water was poured. These days, many people just use their phones for this, but this opens the possibility of all of the other distractions that a phone might also provide. At least set it to airplane mode so you won't get calls during the cupping session.
Water pouring vessels may or may not be necessary. If you're heating the water in a kettle that you can produce a controlled pour from, that's all you need (a towel to help keep your hand cool might be a good idea), but if you're drawing water from a hot water tower you'll need something to transport the water and pour it into cups. You want enough pouring vessels to promptly fill all of the cupping bowls.
Next are supplies that the panelists need to perform the evaluation.
It's a good idea to always have a few extra cupping spoons. Each panelist needs their own, but anybody skimming grounds from the cup might want a 2nd spoon for that. Extra spoons also means that if someone drops their spoon on the floor they can just grab another one.
When performing any kind of evaluation, you want to be able to document your observations. Just like you shouldn't count on remembering all of the supplies you need, you shouldn't count on being able to remember all of your observations about all of the samples. This could be as simple as blank paper or it could be a highly structured form. What's appropriate will depend on the purpose of the evaluation. If you're using an electronic cupping form, you might not need these, but if you can't count on everybody having compatible technology, you'll want to have paper forms available.
If you're using paper, you'll want clipboards. One per panelist.
If you're using paper, you'll need writing utensils. I like to use pens for this, others prefer pencil. In either case you'll want one per panelist plus a few spares and if you're using pencils, you might want to add a pencil sharpener to the checklist.
Finally, room temperature bottled water is listed for use as a palate cleanser. You could just use a cup of good quality water if that's available at your facility, but water from the taps will usually be colder than ideal. Having that water in a bottle also provides visual distinction so you don't have people accidentally trying to drink from the rinse cups.
If you do things differently, feel free to customize this list for your own facility and for the different types of evaluation that you perform. You'll find that there's a lot of overlap with different evaluation types, but how you set up a cupping for pre-ship samples of coffees on a subject to approval of sample contract isn't the same as how you set up a triangulation cupping for production quality assurance. This is also a great place to put details like correct grinder settings or what the water heater should be set at.
By documenting your procedures and having convenient checklists, you'll be able to perform your cupping sessions in a way that is less prone to costly errors and in a way that makes it easier to get high quality data that can be used for better decision making in your facility.